• Download Easyb MS Word Guide: Learn How To Work Sensibly On MS Word

    am delighted to inform you of my first free EBook on blogging; Easyb MS Word Guide. It is a step by step guide (including pictures) which will teach you how to work sensibly on MS Word 2007....... Read More

  • HOW TO SELECT AND INVITE ALL FACEBOOK FRIENDS AT ONCE.

    On facebook of nowadays,there are many groups/pages which facebookers belong to,and as a blogger or website owner,it's very good to own a page for your blog/site. In order to make your page more popular,you will need to invite...Read More

  • HOW TO UNLOCK MODEM FREE.

    Unlock your modem without paying CC for any BODY You will agree with me,that most huawei modems are tied to just one specific service provider.Different forums, blogs ,websites etc,bring up the issue of modem unlocking,but most times fail to complete it,while some...Read More

Monday, 24 March 2014

Author Unknown posted on 02:15 in

Though I've explained how to add the sharing bar when I published how to add Facebook Share & Like buttons, Digg and Tweet Button to the side of blogger/blogspot blogs, I've recoded a better one which I decided to share with you. I have replaced "Facebook Like button" with the new Facebook Share button and removed Digg and SU buttons.
More so, since displaying too many social media counters could affect the speed at which your blog loads, I've added a AddThis share button which provide your visitors with over 300+ social sharing options all in one place.

Below is a screenshot:


So, How Do I add the Floating Share bar to my Blogger/blogspot blog?

Adding the Vertical Floating Bar to a Blogger blog is very easy. You just have to copy a snippet of code,and drop it into a HTML/JavaScript gadget.

STEPS

  • Log in to your Blogger account.
  • Go to Layout
  • Click "Add A Gadget"
  • In Add A Gadget window, select HTML/Javascript
  • Copy the code highlighted below and paste it inside the HTML/Javascript box
<!-- floating page sharers Start Share This With Friends-->
<style>
#pageshare {position:fixed; bottom:15%; right:10px; float:left; border-radius:5px;-moz-border-radius:5px;-webkit-border-radius:5px;background-color:#fff;padding:0 0 2px 0;z-index:10;}
#pageshare .sbutton {float:left;clear:both;margin:5px 5px 0 5px;}
.fb_share_count_top {width:48px !important;}
.fb_share_count_top, .fb_share_count_inner {-moz-border-radius:3px;-webkit-border-radius:3px;}
.FBConnectButton_Small, .FBConnectButton_RTL_Small {width:49px !important; -moz-border-radius:3px;-webkit-border-radius:3px;}
.FBConnectButton_Small .FBConnectButton_Text {padding:2px 2px 3px !important;-moz-border-radius:3px;-webkit-border-radius:3px;font-size:8px;}
</style>
<div id='pageshare' title="Share This With Your Friends">
<div class='sbutton' id='rt'>
<a href="http://twitter.com/share" class="twitter-share-button" data-count="vertical" >Tweet</a>
<script src='http://platform.twitter.com/widgets.js' type="text/javascript"></script>
</div>
<div class='sbutton' id='gb'>
<script src="http://connect.facebook.net/en_US/all.js#xfbml=1"></script>
<div class="fb-share-button" data-type="box_count"></div></div>
<div class='sbutton' id='gplusone'>
<g:plusone size="tall"></g:plusone>
</div>
<div class='sbutton' id='at'>
<a class="addthis_counter"></a>
<script type="text/javascript" src="//s7.addthis.com/js/300/addthis_widget.js"></script>
</div>
<div style="clear: both;font-size: 9px;text-align:center;"> <a href="http://www.ogbongeblog.com/2013/04/floating-sharing-bar-for-blogger-blogs.html" rel="nofollow">Get this</a></div>
</div>
<!-- floating page sharers End -->


Save the gadget and click "Save arrangement" button on the upper right corner.

View your blog and I hope it works for you.
Author Unknown posted on 02:13 in

In this tutorial, I am sharing with you, how to add floating bar of social media buttons to a Blogger blog. This simple and very useful widget includes Facebook Share, Tweet, Digg and Facebook Like buttons. Each of them comes with a live counter.

This widget is a modified version of the widget originally created by BloggerSentral. In the modified version of the widget am sharing with you, I have introduced the facebook Like button and replaced the TweetMeme button with standard Tweet button. More so, the bar will float far to the left of your blog.

I. Adding the buttons

  1. Login to your Blogger account.
  2. Go to Layout.
  3. Click Add A Gadget.
  4. In Add A Gadget window, select HTML/Javascript .
  5. Copy the code highlighted below and paste it inside the HTML/Javascript box. 


<!-- floating page sharers Start Share This With Friends-->
<style>
#pageshare {position:fixed; bottom:15%; left:10px; float:left; border-radius:5px;-moz-border-radius:5px;-webkit-border-radius:5px;background-color:#fff;padding:0 0 2px 
0;z-index:10;}
#pageshare .sbutton {float:left;clear:both;margin:5px 5px 0 5px;}
.fb_share_count_top {width:48px !important;}
.fb_share_count_top, .fb_share_count_inner {-moz-border-radius:3px;-webkit-border-radius:3px;}
.FBConnectButton_Small, .FBConnectButton_RTL_Small {width:49px !important; -moz-border-radius:3px;-webkit-border-radius:3px;}
.FBConnectButton_Small .FBConnectButton_Text {padding:2px 2px 3px !important;-moz-border-radius:3px;-webkit-border-radius:3px;font-size:8px;}
</style>
<div id='pageshare' title="Share This With Your Friends">
<div class='sbutton' id='fb'>
<a name="fb_share" type="box_count" href="http://www.facebook.com/sharer.php">Share</a><script src="http://static.ak.fbcdn.net/connect.php/js/FB.Share" 
type="text/javascript"></script>
</div>
<div class='sbutton' id='rt'>
<a href="http://twitter.com/share" class="twitter-share-button" data-count="vertical" >Tweet</a>
<script src='http://platform.twitter.com/widgets.js' type="text/javascript"></script>
</div>
<div class='sbutton' id='su'>
<script src="http://www.stumbleupon.com/hostedbadge.php?s=5"></script>
</div>
<div class='sbutton' id='digg' style='margin-left:3px;width:48px'>
<script src='http://widgets.digg.com/buttons.js' type='text/javascript'></script>
<a class="DiggThisButton DiggMedium"></a>
</div>
<div class='sbutton' id='gb'>
<script src="http://connect.facebook.net/en_US/all.js#xfbml=1"></script>
<fb:like layout="box_count" show_faces="false" font=""></fb:like></div>
<div style="clear: both;font-size: 9px;text-align:center;"><a href="">Get</a> <a href="">this</a></div>
</div>
<!-- floating page sharers End -->


Save the gadget and Click Save button on the upper right corner.

View Your blog and I hope it works for you.

Join the BloggersLab on facebook today for instant answers to your blogging questions, while also connecting with other Bloggers.

Feel Free to share this blog post with your friends using the share buttons below this post.

If you have anything to contribute or ask, Kindly make use of the comment form below.

Please, do not forget to SUBSCRIBE to this blog, so that you can be receiving future Blogging tricks/tips, articles, freebies DIRECTLY into your email inbox, even when you are not online.

Saturday, 22 March 2014

Author Unknown posted on 01:40 in

I am delighted to inform you of my first free EBook on blogging; Easyb MS Word Guide. It is a step by step guide (including pictures) which will teach you how to work sensibly on MS Word 2007.

  https://docs.google.com/viewer?a=v&pid=sites&srcid=ZGVmYXVsdGRvbWFpbnxyZWxhdGVkdHJpY2tzfGd4OjRiNzFhZWQxNzg5YTI1Yw


Thursday, 20 March 2014

Author Unknown posted on 04:22 in

Recently, I explained how I disable sidebars and footers on Blogger pages. The trick I shared in the tutorial only disables the sidebar and footer in specific static page i.e the code will be inserted directly in the static page and will affect only the page. No template editing is needed.

Today, I am sharing with you, tutorial on how to disable the sidebar and footer in ALL the static Pages of your blog. No need inserting codes in directly in the static pages, although template editing is needed. This customization allows you to easily make all your static pages look different from your post pages.

Let's get started

==> Log in to your Blogger dashboard at www.blogger.com
==> Back up your template
==> Go to "Template" > "Edit HTML"
==> Click inside the editor and use CTRL F to find ]]></b:skin> tag
==> Directly below (under) the tag, copy and paste this code:


<b:if cond='data:blog.pageType == &quot;static_page&quot;'>
<style>
.sidebar,.footer {display:none;}
#main-wrapper{width: 95%; float: none; margin: 0 auto;}
</style>
</b:if>


==> Click "Save Template"

View your static pages (NOT posts). The sidebar and footer should now be hidden.

I hope this works for you.

Cheers!
Author Unknown posted on 04:20 in

This can be so useful when creating a landing page for your blog or when creating a page where you don't want blog visitors that land on the page to be distracted by widgets on your sidebars and blog footer.

If I don't want the Google ads on my sidebar to appear on a page I want to advertise with Google Adwords, I simply disable the sidebar.


So, How ?

==> After creating a page, I switch to the HTML mode of the post editor and paste the code below into the editor:

<style type="text/css">
.blog-pager, .post-footer, .feed-links, .sidebar, .footer-outer { display:none;}
.main-inner .columns {width: 100%;padding-left:0 !important;padding-right:0 !important;}
</style>


==> Then, I proceed to type in the content of the page, switch back to compose mode (not compulsory) and publish the page.

That's all.
Author Unknown posted on 04:12 in

When it comes to getting "likes" for your Facebook page, installing a pop up like box is highly recommended because it will be compelling all your blog readers to like your Facebook page as it will pop up on any loaded page of your blog.

There are a lot of bloggers out there mostly the newbies that have the interest of enabling a pop up Facebook like box on their blog(s) but because of the fear of editing their blog HTML, they rather run their blog with their Facebook like box on their sidebar only to avoid scattering their blog design.

In this tutorial, I am sharing with you, how to enable Facebook pop up for Blogger blog whenever someone visits any of your web pages.

Below is a snapshot of what it looks like:


How To Get Started

==> Log in to your blogger dashboard

==> Go to "Layout" and click on "Add a Gadget" (in sidebar or footer section)

==> Click on "HTML/Java Script" gadget

==> Copy the code below and paste in the box. Leave the title blank.

<link rel="stylesheet"
href="http://code.jquery.com/ui/1.10.3/themes/smoothness/jquery-ui.css"
/>
<script src="http://code.jquery.com/jquery-1.9.1.js"></script>
<script src="http://code.jquery.com/ui/1.10.3/jquery-ui.js"></script>
<link rel="stylesheet" href="/resources/demos/style.css" />
<script>
$(function() {
$( "#dialog" ).dialog();
});
</script>
<div id="dialog" title="Get updates via Facebook">
<center>
<iframe src="//www.facebook.com/plugins/likebox.php?href=https://www.facebook.com/YourPageUsername&width=292&height=258&show_faces=true&colorscheme=light&stream=false&show_border=true&header=false"
scrolling="no" frameborder="0" style="border:none; overflow:hidden;
width:285px; height:258px;"
allowtransparency="true"></iframe></center>
</div>


==> Click on "Save". 

Remember to change the phrase YourPageUsername with the username of the Facebook page that you want to be popping up.

How Do I Get My Facebook Username?

You can get your Facebook username here if you don't know it. 

That’s all.
Is this work for you or not? Please, let me hear from you via comments.
Author Unknown posted on 03:39 in

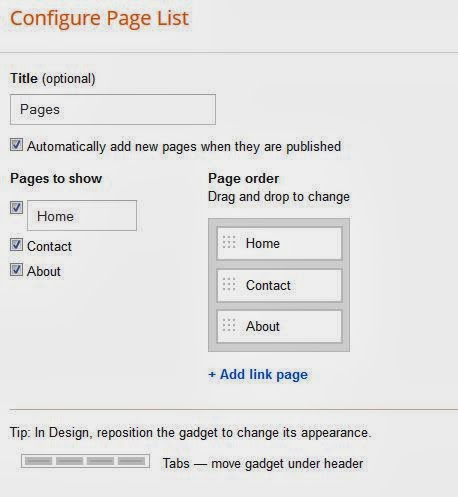
Blogger PAGES has been modified as well as the Pages/PageList gadget. Under the “Pages” section of the Blogger dashboard, you can now navigate between viewing all your pages, just your drafted pages, or only your published pages. You may also see a category for Imported pages if you’ve imported your pages from another platform like Wordpress. 


More so, the "web address" option is no longer available after clicking the "New Page" tab. Henceforth, if you want to create a PAGES tab that will link to an external web address or elsewhere, you will have to use the "add link page" that has been integrated into the Pages/PageList gadget.


How To Use Blogger ADD LINK PAGE


==> Ensure you have added the PAGES gadget to your blog. If not, log in to your Blogger dashboard, go to LAYOUT, click ADD A GADGET, select PAGES and click SAVE.

==> Still on LAYOUT page, click the "edit" link under the PAGES gadget.


==> The widget configuration box will pop up. Scroll down till you see add link page.


==> Click on it and you should see the "web address" box.


==> Enter the title and the URL in their respective fields and SAVE.

==> View your blog and you should now see the tab/link pointing to the web address you entered.

That's all.

NOTE: 

==> Under “Page Order,” (in the PageList widget configuration window), you can drag and drop the boxes to choose the order in which your pages/tabs will appear.

==> For now, you cannot edit a link page added via the web address box. To edit it, just click on the x sign to delete it. Then, create a new link page and re-arrange as desired.

I hope this helps.

Download Easyb MS Word Guide

Email Subscription box byAshok Lothia

Contact Easyb Tricks

Privacy Policy |Copyright © 2014,Easyb Trick.All Rights Reserved. Powered by Blogger.

Contact Me Here!!!

Name

Email *

Message *