• Download Easyb MS Word Guide: Learn How To Work Sensibly On MS Word

    am delighted to inform you of my first free EBook on blogging; Easyb MS Word Guide. It is a step by step guide (including pictures) which will teach you how to work sensibly on MS Word 2007....... Read More

  • HOW TO SELECT AND INVITE ALL FACEBOOK FRIENDS AT ONCE.

    On facebook of nowadays,there are many groups/pages which facebookers belong to,and as a blogger or website owner,it's very good to own a page for your blog/site. In order to make your page more popular,you will need to invite...Read More

  • HOW TO UNLOCK MODEM FREE.

    Unlock your modem without paying CC for any BODY You will agree with me,that most huawei modems are tied to just one specific service provider.Different forums, blogs ,websites etc,bring up the issue of modem unlocking,but most times fail to complete it,while some...Read More

Showing posts with label Blogging tips. Show all posts

Monday, 24 March 2014

Author Unknown posted on 02:15 in

Though I've explained how to add the sharing bar when I published how to add Facebook Share & Like buttons, Digg and Tweet Button to the side of blogger/blogspot blogs, I've recoded a better one which I decided to share with you. I have replaced "Facebook Like button" with the new Facebook Share button and removed Digg and SU buttons.
More so, since displaying too many social media counters could affect the speed at which your blog loads, I've added a AddThis share button which provide your visitors with over 300+ social sharing options all in one place.

Below is a screenshot:


So, How Do I add the Floating Share bar to my Blogger/blogspot blog?

Adding the Vertical Floating Bar to a Blogger blog is very easy. You just have to copy a snippet of code,and drop it into a HTML/JavaScript gadget.

STEPS

  • Log in to your Blogger account.
  • Go to Layout
  • Click "Add A Gadget"
  • In Add A Gadget window, select HTML/Javascript
  • Copy the code highlighted below and paste it inside the HTML/Javascript box
<!-- floating page sharers Start Share This With Friends-->
<style>
#pageshare {position:fixed; bottom:15%; right:10px; float:left; border-radius:5px;-moz-border-radius:5px;-webkit-border-radius:5px;background-color:#fff;padding:0 0 2px 0;z-index:10;}
#pageshare .sbutton {float:left;clear:both;margin:5px 5px 0 5px;}
.fb_share_count_top {width:48px !important;}
.fb_share_count_top, .fb_share_count_inner {-moz-border-radius:3px;-webkit-border-radius:3px;}
.FBConnectButton_Small, .FBConnectButton_RTL_Small {width:49px !important; -moz-border-radius:3px;-webkit-border-radius:3px;}
.FBConnectButton_Small .FBConnectButton_Text {padding:2px 2px 3px !important;-moz-border-radius:3px;-webkit-border-radius:3px;font-size:8px;}
</style>
<div id='pageshare' title="Share This With Your Friends">
<div class='sbutton' id='rt'>
<a href="http://twitter.com/share" class="twitter-share-button" data-count="vertical" >Tweet</a>
<script src='http://platform.twitter.com/widgets.js' type="text/javascript"></script>
</div>
<div class='sbutton' id='gb'>
<script src="http://connect.facebook.net/en_US/all.js#xfbml=1"></script>
<div class="fb-share-button" data-type="box_count"></div></div>
<div class='sbutton' id='gplusone'>
<g:plusone size="tall"></g:plusone>
</div>
<div class='sbutton' id='at'>
<a class="addthis_counter"></a>
<script type="text/javascript" src="//s7.addthis.com/js/300/addthis_widget.js"></script>
</div>
<div style="clear: both;font-size: 9px;text-align:center;"> <a href="http://www.ogbongeblog.com/2013/04/floating-sharing-bar-for-blogger-blogs.html" rel="nofollow">Get this</a></div>
</div>
<!-- floating page sharers End -->


Save the gadget and click "Save arrangement" button on the upper right corner.

View your blog and I hope it works for you.
Author Unknown posted on 02:13 in

In this tutorial, I am sharing with you, how to add floating bar of social media buttons to a Blogger blog. This simple and very useful widget includes Facebook Share, Tweet, Digg and Facebook Like buttons. Each of them comes with a live counter.

This widget is a modified version of the widget originally created by BloggerSentral. In the modified version of the widget am sharing with you, I have introduced the facebook Like button and replaced the TweetMeme button with standard Tweet button. More so, the bar will float far to the left of your blog.

I. Adding the buttons

  1. Login to your Blogger account.
  2. Go to Layout.
  3. Click Add A Gadget.
  4. In Add A Gadget window, select HTML/Javascript .
  5. Copy the code highlighted below and paste it inside the HTML/Javascript box. 


<!-- floating page sharers Start Share This With Friends-->
<style>
#pageshare {position:fixed; bottom:15%; left:10px; float:left; border-radius:5px;-moz-border-radius:5px;-webkit-border-radius:5px;background-color:#fff;padding:0 0 2px 
0;z-index:10;}
#pageshare .sbutton {float:left;clear:both;margin:5px 5px 0 5px;}
.fb_share_count_top {width:48px !important;}
.fb_share_count_top, .fb_share_count_inner {-moz-border-radius:3px;-webkit-border-radius:3px;}
.FBConnectButton_Small, .FBConnectButton_RTL_Small {width:49px !important; -moz-border-radius:3px;-webkit-border-radius:3px;}
.FBConnectButton_Small .FBConnectButton_Text {padding:2px 2px 3px !important;-moz-border-radius:3px;-webkit-border-radius:3px;font-size:8px;}
</style>
<div id='pageshare' title="Share This With Your Friends">
<div class='sbutton' id='fb'>
<a name="fb_share" type="box_count" href="http://www.facebook.com/sharer.php">Share</a><script src="http://static.ak.fbcdn.net/connect.php/js/FB.Share" 
type="text/javascript"></script>
</div>
<div class='sbutton' id='rt'>
<a href="http://twitter.com/share" class="twitter-share-button" data-count="vertical" >Tweet</a>
<script src='http://platform.twitter.com/widgets.js' type="text/javascript"></script>
</div>
<div class='sbutton' id='su'>
<script src="http://www.stumbleupon.com/hostedbadge.php?s=5"></script>
</div>
<div class='sbutton' id='digg' style='margin-left:3px;width:48px'>
<script src='http://widgets.digg.com/buttons.js' type='text/javascript'></script>
<a class="DiggThisButton DiggMedium"></a>
</div>
<div class='sbutton' id='gb'>
<script src="http://connect.facebook.net/en_US/all.js#xfbml=1"></script>
<fb:like layout="box_count" show_faces="false" font=""></fb:like></div>
<div style="clear: both;font-size: 9px;text-align:center;"><a href="">Get</a> <a href="">this</a></div>
</div>
<!-- floating page sharers End -->


Save the gadget and Click Save button on the upper right corner.

View Your blog and I hope it works for you.

Join the BloggersLab on facebook today for instant answers to your blogging questions, while also connecting with other Bloggers.

Feel Free to share this blog post with your friends using the share buttons below this post.

If you have anything to contribute or ask, Kindly make use of the comment form below.

Please, do not forget to SUBSCRIBE to this blog, so that you can be receiving future Blogging tricks/tips, articles, freebies DIRECTLY into your email inbox, even when you are not online.

Thursday, 20 March 2014

Author Unknown posted on 04:22 in

Recently, I explained how I disable sidebars and footers on Blogger pages. The trick I shared in the tutorial only disables the sidebar and footer in specific static page i.e the code will be inserted directly in the static page and will affect only the page. No template editing is needed.

Today, I am sharing with you, tutorial on how to disable the sidebar and footer in ALL the static Pages of your blog. No need inserting codes in directly in the static pages, although template editing is needed. This customization allows you to easily make all your static pages look different from your post pages.

Let's get started

==> Log in to your Blogger dashboard at www.blogger.com
==> Back up your template
==> Go to "Template" > "Edit HTML"
==> Click inside the editor and use CTRL F to find ]]></b:skin> tag
==> Directly below (under) the tag, copy and paste this code:


<b:if cond='data:blog.pageType == &quot;static_page&quot;'>
<style>
.sidebar,.footer {display:none;}
#main-wrapper{width: 95%; float: none; margin: 0 auto;}
</style>
</b:if>


==> Click "Save Template"

View your static pages (NOT posts). The sidebar and footer should now be hidden.

I hope this works for you.

Cheers!
Author Unknown posted on 04:20 in

This can be so useful when creating a landing page for your blog or when creating a page where you don't want blog visitors that land on the page to be distracted by widgets on your sidebars and blog footer.

If I don't want the Google ads on my sidebar to appear on a page I want to advertise with Google Adwords, I simply disable the sidebar.


So, How ?

==> After creating a page, I switch to the HTML mode of the post editor and paste the code below into the editor:

<style type="text/css">
.blog-pager, .post-footer, .feed-links, .sidebar, .footer-outer { display:none;}
.main-inner .columns {width: 100%;padding-left:0 !important;padding-right:0 !important;}
</style>


==> Then, I proceed to type in the content of the page, switch back to compose mode (not compulsory) and publish the page.

That's all.
Author Unknown posted on 04:12 in

When it comes to getting "likes" for your Facebook page, installing a pop up like box is highly recommended because it will be compelling all your blog readers to like your Facebook page as it will pop up on any loaded page of your blog.

There are a lot of bloggers out there mostly the newbies that have the interest of enabling a pop up Facebook like box on their blog(s) but because of the fear of editing their blog HTML, they rather run their blog with their Facebook like box on their sidebar only to avoid scattering their blog design.

In this tutorial, I am sharing with you, how to enable Facebook pop up for Blogger blog whenever someone visits any of your web pages.

Below is a snapshot of what it looks like:


How To Get Started

==> Log in to your blogger dashboard

==> Go to "Layout" and click on "Add a Gadget" (in sidebar or footer section)

==> Click on "HTML/Java Script" gadget

==> Copy the code below and paste in the box. Leave the title blank.

<link rel="stylesheet"
href="http://code.jquery.com/ui/1.10.3/themes/smoothness/jquery-ui.css"
/>
<script src="http://code.jquery.com/jquery-1.9.1.js"></script>
<script src="http://code.jquery.com/ui/1.10.3/jquery-ui.js"></script>
<link rel="stylesheet" href="/resources/demos/style.css" />
<script>
$(function() {
$( "#dialog" ).dialog();
});
</script>
<div id="dialog" title="Get updates via Facebook">
<center>
<iframe src="//www.facebook.com/plugins/likebox.php?href=https://www.facebook.com/YourPageUsername&width=292&height=258&show_faces=true&colorscheme=light&stream=false&show_border=true&header=false"
scrolling="no" frameborder="0" style="border:none; overflow:hidden;
width:285px; height:258px;"
allowtransparency="true"></iframe></center>
</div>


==> Click on "Save". 

Remember to change the phrase YourPageUsername with the username of the Facebook page that you want to be popping up.

How Do I Get My Facebook Username?

You can get your Facebook username here if you don't know it. 

That’s all.
Is this work for you or not? Please, let me hear from you via comments.
Author Unknown posted on 03:39 in

Blogger PAGES has been modified as well as the Pages/PageList gadget. Under the “Pages” section of the Blogger dashboard, you can now navigate between viewing all your pages, just your drafted pages, or only your published pages. You may also see a category for Imported pages if you’ve imported your pages from another platform like Wordpress. 


More so, the "web address" option is no longer available after clicking the "New Page" tab. Henceforth, if you want to create a PAGES tab that will link to an external web address or elsewhere, you will have to use the "add link page" that has been integrated into the Pages/PageList gadget.


How To Use Blogger ADD LINK PAGE


==> Ensure you have added the PAGES gadget to your blog. If not, log in to your Blogger dashboard, go to LAYOUT, click ADD A GADGET, select PAGES and click SAVE.

==> Still on LAYOUT page, click the "edit" link under the PAGES gadget.


==> The widget configuration box will pop up. Scroll down till you see add link page.


==> Click on it and you should see the "web address" box.


==> Enter the title and the URL in their respective fields and SAVE.

==> View your blog and you should now see the tab/link pointing to the web address you entered.

That's all.

NOTE: 

==> Under “Page Order,” (in the PageList widget configuration window), you can drag and drop the boxes to choose the order in which your pages/tabs will appear.

==> For now, you cannot edit a link page added via the web address box. To edit it, just click on the x sign to delete it. Then, create a new link page and re-arrange as desired.

I hope this helps.
Author Unknown posted on 03:34 in

Creating Blogger menu is now very easy via the new Blogspot Interface. You can now create menu on Blogspot blogs without using html and you can make the tabs to link to a post/page on your blog, a label or any external link. In this tutorial, I will show you how to create navigation tabs for your blogger blog without html coding.

You can make the tabs to appear horizontally under your blog header or on your sidebar as seen in the picture below:
tabs
If you create your navigation menu the way I am going to explain in this tutorial, the menu will also display on your blogger mobile template as seen on my own blogger mobile template below:

How To Get Started

== > If you are still using the old blogger , you can log in to your blogger dashboard and switch to the new blogger dashboard so you can easily follow this tutorial.
Log in to www.blogger.com or www.blogspot.com

Once logged into your dashboard, click on your blog and look by the left menu. Click on Pages . You should see something similar to the picture below:


You can use the  "New Page" tab to create a new Blogger Page and a tab that links to any web address( This might be a link to a web page a blog post or a download link)

The "Show Pages as" tab is what you will use to control where you want your navigation tabs to appear on your blog. You can set it to appear under your header (Top tabs) or on the sidebar (Side links).

Example

Now, let me assume you want to create a tab that links to an external link ( eg http://relatedtricks.blogspot.com/).

Click on the "New Page" tab and click on "Web Address" as seen in the picture below:


You will see a new window like the one below :


==> Enter what you want to be displayed on the tab in the first text area. In this example, I entered "Send SMS"
==> Enter the web address you want to link to in the second text area. In this example, I entered "http://relatedtricks.blogspot.com/search/label/Blogging%20tips"

Click "Save".

What Next?

The next thing to do is to make the tabs appear on your blog.

So, click on the "Show pages as" tab and set it to "Top tabs"


Then, click on "Save Arrangement" by the top right hand corner of your dashboard.

View your blog and you should see the tabs appear under your blog header.

UPDATE: The Web Address option has been replaced with "Add link page". Read more here


Want Your Tab to Point to a Label(Category)?

Remember, if you visit a LABEL's link, it will display the POSTS that has be categorized under the LABEL.

If you want to point your tab to a label (category), get the link of the label(category) handy and enter it in the space for "Web address" as explained when creating a tab pointing to external url above.

Below is what the structure of a Label/category link looks like:

'http://relatedtricks.blogspot.com/search/label/Blogging%20tips'

Don't know how to get your LABEL link? Well,provided you have already added the LABELS gadget to your blog, view your blog, right-click on one of the labels(categories) and choose "Copy Link Location". Paste it in a Notepad and use it accordingly.

That's all.

NOTE

If you click "Blank Page" after clicking the "New page" tab, you will see a page editor which you can use to create a Blogger page like Contact Me, About Me pages.  Whatever you enter as the title of the page is what will display on the tab on your blog.

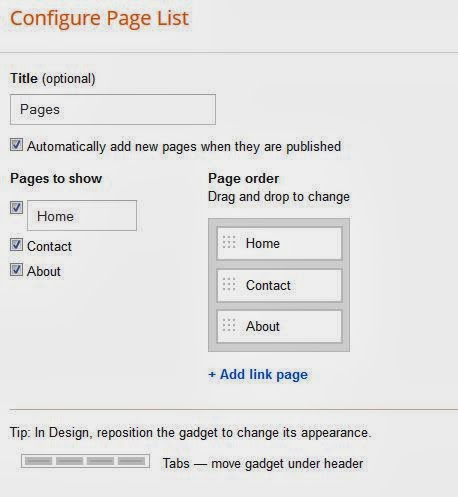
You can re-arrange your tabs or hide some PAGES you don't want to appear as tabs. To do this, go to "Layout" and click on the "edit" next to the "PAGES" gadget.

You should see a new window similar to the one below:

pageswidget

You can untick PAGES you want to hide. To re-arrange your tabs, just drag and drop (under Page order) to change the order of your tabs.

I hope this helps...

If you have questions to ask or have contributions to make, kindly make use of the comment from below.

In my future posts, I will be sharing more Blogger tips. So, subscribe to my blog if you want to be receiving the tutorials in your email inbox even if you are not online when I post the tutorials. Make sure you verify your subscription by clicking on the link that will be in the mail that will be sent to you once you subscribe.

If you are on Facebook, you can join the Bloggerslab Group so you can connect with other bloggers.

Cheers!


Author Unknown posted on 03:09 in

Right from your Blogger dashboard, you can now change the template of your blogger's default mobile template to your desired template. I have changed mine from the default to one of variants of the "Simple" Template. You can change your mobile template either via the old Blogger interface or the updated blogger interface.


To change your mobile template, login to your Blogger account,  click on  "Template" from the left menu of your Blogger dashboard. Then, click on the settings icon below the mobile template as seen in the picture below:


Thereafter, you should see something similar to the picture below:


Right there, you can change your template as indicated with the arrows in the picture above.

You can preview it with the "Preview" button  and once you are satisfied, you can click on SAVE.

To view your mobile version of your blog, add " ?m=1 " to the end of your blog url e.g mine is: http://relatedtricks.blogspot.com?m=1

I hope this helps..

Cheers!
Author Unknown posted on 02:59 in

Despite the fact that I've explained how to add labels to Blogger posts many bloggers keep asking me how to put posts into Blogger/Blogspot pages i.e make selected posts appear on other pages of a Blogger blog apart from the homepage.


For example, if you click the "Blogger Tips" tab on my blog, it will open the "Blogger Tips" page that displays posts that are related to "Blogger Tips". Those posts are the posts that I've labelled with "blogger tips".

Looking closely at the URL of the page, you will notice that it looks like : http://relatedtricks.blogspot.com/search/label/Blogging%20tips

In this tutorial, I will explain to you how to create such Pages i.e I am going to show you how to use Blogger Pages to organize your blog posts on different pages using labels.

Now, let's assume you want to create a page titled "music" and you want all posts related to music to be displayed on the page.

==> Login to Blogger dashboard and click on "Pages"

==> Click on the "New Page" tab and click on "Web Address" as seen in the picture below:


==> Insert the link below and enter a name for the label

LINK TO YOUR BLOG/search/label/NAME OF THE LABEL

 eg  http://relatedtricks.blogspot.com/search/label/Blogging%20tips

The name of the label is what you will add to each post you want to be displayed on the page. Any post (new or old) that you add this label to, will be filed under the page.


For Example, any post I labelled with "Blogging" will be displayed on the page : 
http://relatedtricks.blogspot.com/search/label/Blogging%20tips

The page will be blank if I don't label any of my post with "music".

That's all.

UPDATE: The Web Address option has been replaced with "Add link page".

You can link a navigation tab to the link of the page (i.e http://relatedtricks.blogspot.com/search/label/Blogging%20tips ). You can also use the link inside your posts or use the "Link List" gadget to add such links to your Blogger sidebar.

If you don't want the Page to appear as a tab in your Blog navigation bar, go to "Layout", click "edit" under the Pages gadget, untick the Page and SAVE

Don't know how to label your posts? Read: How To Add Labels To Blogger Posts.

NOTE:

1. Labels are case-sensitive.  It's preferable to type your labels in small letters.
2. If the name of your page will be more than one word eg blogging tips, PC tricks, please click here to check out the trick that works perfectly for such. 

Author Unknown posted on 02:36 in

If you've been finding it difficult to integrate the Facebook comment box with your Blogger blog, sit back and relax as I guide you on how to add Facebook comments plugin to Blogspot blogs using HTML5.

For you to add the Facebook social plugin to your blog, you will need the Facebook Application ID of the blog. If you know the ID, copy it somewhere and if you don't know it you can check the Facebook apps page.

You can read: How To Get Facebook Application ID to generate one for your blog.

Next is to log in to your Blogger dashboard, back up your template and go to "Template" > "Edit HTML"

==> Click inside the HTML and use CTRL F to find : <body

==> Directly below it, paste <div id='fb-root'/> OR <div id="fb-root"></div>

==> Open a new tab on your browser and go to www.freehtmlparser.blogspot.com
==> Copy and paste the code below inside the box on the page


<script>(function(d, s, id) {
  var js, fjs = d.getElementsByTagName(s)[0];
  if (d.getElementById(id)) return;
  js = d.createElement(s); js.id = id;
  js.src = "//connect.facebook.net/en_US/all.js#xfbml=1&appId=522587054526444";
  fjs.parentNode.insertBefore(js, fjs);
}(document, 'script', 'facebook-jssdk'));</script>

==> Carefully replace the highlighted appID with the ID of your blog
==> Click "Encode"

==> Go back to the browser tab where you have your blog HTML

==> Copy and Paste the encoded script directly below the  <div id='fb-root'/>

==> Now, your html should look similar to the screenshot below:


==> Click "Save Template"

==> Click inside the HTML and use CTRL F to find :
<div class='post-footer-line post-footer-line-3'>
 OR
<div class='post-footer-line post-footer-line-3'/>
 OR
<data:post.body/>

==> Directly below it, paste this code : 

<b:if cond='data:blog.pageType == &quot;item&quot;'>
<p align='center'>
<img alt='' class='icon-action' src='https://blogger.googleusercontent.com/img/b/R29vZ2xl/AVvXsEjv5xxuCGxaVVWDLSeMd_hon6o8N4HOj38h_mKhWRwA2mKF9vmm6gqA_6vaQ_NrhQUKX9_Q34ebXt8YbF7fkD_DLRIH-CjC9DQ2LEN0za8gIEgH0buPHf18t1xBxSjW79VXnzSfqz7Lk3f6/s1600/cmds.png'/> </p>
<div style='text-align: center;'>
<div class="fb-comments" expr:href='data:post.url' data-width="300" data-numposts="10" data-colorscheme="light"></div></div>
</b:if>

==> Click "Save Template"

NB: You can change the data-width from 300 to any width you want.

That's all.

Check out the desktop view (not Mobile View) of any post on your blog and you should see the comment form below the post.

Please, let me know if it works for you.

Also use the comment form to let me know if you face some challenges.

Please, SHARE this with friends.

Cheers!

Tuesday, 18 March 2014

Author Unknown posted on 04:45 in
If you are not yet using an header banner for your Blogger blog, you can still make the title and description of your blog to appear in the middle of your header by adding some piece of code to your blog html. In this tutorial, a Video tutorial is also included to show you how to get it done.

How To Get Started

==> If you are still using the old Blogger dashboard, you can log in to your blogger dashboard and switch to the new blogger dashboard so you can easily follow this tutorial.

Log in to your Blogger dashboard

Click on "Template" (on the right hand side menu). You will see something similar to the picture below:


Click on the "Customize" button. This will open up the "Template DesignerOn the left menu, you will see "Advanced", Click on it.

new menu will appear by the right. Scroll down till you see"Add CSS". Click on it.

A box will appear by the right hand side. Copy and paste the code below in it
.Header h1, .Header .description{
text-align:center;
}


Click "Apply to Blog" by the top right hand corner.

If you view your blog, the title and description should now be at the center of your blog header as seen in the picture below:


That's all.

NOTE: If you downloaded a third party template that is not compatible with template designer,
==> go to Template > Edit HTML > Proceed
==> use CTRL F to find ]]></b:skin>
==> right above it, paste the alignment code in the post above.
==> Save the template and view your blog.

I hope this helps.....

Cheers
Author Unknown posted on 04:08 in
Labels on Blogger blogs make it easy to categorize your blog posts. Labels are handy if you blog about a lot of different subjects, since readers can then choose to view all of your posts on, say, music at once. Or dancing, or blogging tips, or whatever you happen to be writing about. If you have a team blog, you could also give each member their own label, so you could easily read all the posts by any one of them.


When you're writing a post or editing an old post, click Labels on the side and enter the labels you like, separating them with commas. Labels you've used before will show up below, and you can just click them to add them to the post.

blogger labels


You can place single words or longer phases in the box; whatever you choose to write there, should reflect what your post is about. When you publish your post, the labels will be listed with it.

Clicking any of the labels will take you to a page containing only posts with that label. This gives readers an easy way to navigate your blog based on categories.

If you want to display some or all of your labels on the sidebar, you can make use of the Blogger "Labels" gadget.

That's all.

If you want to add a label to more than one post at a time, you can read : how to group blog posts into labels (categories).

NOTE: Labels are case sensitive. It's preferable to type your labels in small letters.

I hope this helps.
Author Unknown posted on 03:54 in


Labels allow you to group your blog posts into categories. Labels are 
handyif you blog about a lot of different subjects, since readers can then choose to view all of your posts on, say, "Blogging Tips" at once. Or PC PC Tips, or Mobile Tricks, or whatever you happen to be writing about. Today, I am sharing with you how to categorize your blog posts i.e how to add/apply labels to your blog posts.


How To Get Started

Login to your blog dashboard and click on the gray Post List icon (that looks like a sheet of paper) next to the blog you want to edit the labels for as seen in the picture below


You should now see a list of all posts on the blog

Select/tick the posts you want to add a label to (i.e posts you want to put into a category e.g blogging tips)

Click "New Label" as seen in the picture below


You should now see a new window similar to the one below where you can enter the label (name of the category)


Enter it (preferable in small letters) and click OK.

That's all.

Follow the same steps if you want to add another label to the post or to other posts.


If you view the posts you added the label to, the label will be listed with it. You will see it right under the post as seen in the picture below.


Clicking on the label will take you to a page containing only posts with that label.

Cheers!

Author Unknown posted on 02:36 in

If you configure your Blogger blog to show mobile template on mobile devices, the widgets listed below are the ones that are displayed by default:
  • Header
  • Blog
  • Profile
  • PageList
  • AdSense
  • Attribution
If you want any other Blogger widget to display on the mobile view of your Blogger blog, you will have to activate a "custom" mobile template instead of using one of the default Blogger mobile templates.

In addition to that, you will have to add mobile=’yes’ attribute to the <b:widget> tag of the widget, right inside your blog's html.

The "mobile" attribute lets you control which of the widgets on your Blogger blog will be available in mobile view. It can be 'default', 'yes', 'no', or 'only'.

Now, let's assume you have used the HTML/Javascript gadget to add an advert to your Blogger blog and you want it to display on the mobile view of your blog. Just follow me through the steps below:

IMPORTANT: First ensure you have enabled Blogger mobile template and have switched to "Custom" as explained here.

==> Now, you need to get the id of the widget as highlighted below:


As seen above, the id of the widget is HTML31.

==> Next, is to go to "Template" > "Edit HTML"

==> Click on "Jump To Widget" and click on the id of the widget you want to show on the mobile view of your blog. This will take you directly to the <b:widget> tag of the widget.

eg  


<b:widget id='HTML31' locked='false' title='' type='HTML'>....</b:widget>

==> Click inside the tag and type mobile='yes'

Your new code should now like like this:

<b:widget id='HTML31' locked='false'  mobile='yes'  title='' type='HTML'>....</b:widget>  


==> Click "Save Template"

That's all.

You can now view the mobile view of your blog by adding ?m=1 to your blog's URL e.g. www.relatedtricks.blogspot.com?m=1 and you should see the widget been displayed.

Let me know if this works for you.


Recommended: How To Make BlogSpot Blog Compatible With Mobile Phones 

Please, SHARE this tutorial with your friends.  
Author Unknown posted on 02:30 in

With the rise and prominence of mobile web browsing, bloggers are making sure their blogs are mobile friendly. If the desktop view of your blog is what your blog readers see on their mobile phones, then you need to Go Mobile!


It will take much longer to load your blog on smartphones which in turn, might be frustrating your blog readers if you've not optimized your blog for mobile screens. Now, when it comes to making a blog hosted on blogger mobile friendly, all you just need to do is to enable a blogger mobile template for your blog.

Mobile templates will re-format your blogs for smartphones to enhance your readers’ viewing experience. Once enabled, your blogspot blog will automatically be redirected to the mobile view when accessed from a smartphone. The Blogger mobile templates support mobile ads and allow readers to make comments and watch videos.


How Can I Create Mobile Friendly Blogspot Blog?


To make your Blogger blog to be mobile friendly, simply login to your blog dashboard and go to > Template. Click on the gear icon beneath the mobile template preview. Then, select the "Yes. Show mobile template on mobile devices." option. Choose a mobile template and then save settings.


blogger mobile template settings

Your blog readers will now be seeing the Blogger mobile view of your blog whenever they access your blog with a smartphone.

Can I Customize The Mobile View of My Blogspot Blog?


Yes, if you select the "custom" mobile template.

By default Blogger have provided only 8 mobile templates which you can NOT edit as you desired. To edit the mobile view of your blogspot blog, you must activate the custom mobile template. I will discuss this further in another blog post.

NOTE: 

==> Adsense mobile ads will show on the Blogger default mobile templates if you've added, at least one of your Google ad units on your blog, using the ADSENSE GADGET OR if you have configured your blog to display inline ads.

==> Header, Blog, Profile (About Me), AdSense, and Attribution gadgets display by default on Blogger mobile templates.

Happy Mobifying!
Author Unknown posted on 02:18 in

This is a short video to guide you on how to start a blogger blog. I hope you will enjoy it.


If you have anything to say about the video, kindly use the comment form below. Cheers!
Author Unknown posted on 01:43 in

If you really want to increase the page views of your blog, then you must be showing related posts under each post on your blog. Most blogging platforms now feature a number of third-party widgets/plugins that can display a list of related stories on your blog. Typically, these widgets/plugins will look at how a blog post was labeled/tagged and then display a short list of similar posts.


Sometimes back, related posts were been displayed on my blog via a brps hack but after some time, I realized that the related posts no longer display. Hence, I started combing the net for a new solution. Right now, I have 2 hacks: one displays thumbnails, while the other one doesn't. Today, I will be sharing with you how to show your related posts with thumbnails.

Aneesh of Blogger Widgets  created the  "Related Posts" script for Blogger which displays thumbnails of images;

This script links directly to the post page it references, and relies on Blogger's label feeds to display posts related to the post on which it appears.

Aneesh's script seems relatively easy to install. Furthermore, you can customize the number of related posts to be displayed. The image thumbnails displayed for each related post are generated from the thumbnail associated with the relevant post page. Therefore, only images which you have uploaded to each blog post  will be displayed. If there is no image in the related post, a "No-Image" alternative will be be displayed instead. The JavaScript is hosted by Google Code, hence it loads very quickly..

CLICK HERE FOR FULL INSTRUCTIONS ON HOW TO INSTALL THE SCRIPT TO YOUR BLOGGER BLOG

 I hope this helps.....

In my future posts, I will be sharing with you how you can be displaying related posts WITHOUT thumbnails.

If you have anything to say or ask, Kindly make use of the comment form below.
Author Unknown posted on 01:39 in


Having a favicon for your blog have loads of advantages and you can bet that it also adds to the beauty of blogs and websites. Follow the following steps to set up a lovely favicon for your blog...

1. Right click on http://tools.dynamicdrive.com/favicon/ and open it in another tab or another window

2. At the web page, you can generate a favicon from any picture on your pc. Just upload the picture and CLICK on CREATE ICON.

3. Download the generated icon to your PC and RENAME IT. DON'T NAME IT just FAVICON ( researches as indicated that naming it favicon will not make the favicon to be displayed on Blogger blogs but will be fine on other web sites).

4. Upload the picture to a free host and get the url of the uploaded file. ( You can set up an account with photobucket.com and if you already have an account with googlepages, you can also upload it there too)

5. Example of such url of the uploaded file will be like this http://jideogunsanya.googlepages.com/NAMEOFUPLOADEDFILE.ico

6. Copy the URL of your own icon from the free host website you uploaded it to and insert it into the codes below <link href='http://SITENAME.googlepages.com/FILENAME.ico' rel='shortcut icon'/> <link href='http://SITENAME.googlepages.com/FILENAME.ico' rel='icon'/>

7. Log in to the dashboard of your Blogger blog, Go to LAYOUTS and click on EDIT HTML. Remember to BACK UP YOUR BLOG TEMPLATE.

8. In the Html , try to look in the HEAD section for a place where you will see this line of code <b:skin><![CDATA[/* and paste the code you set up in Step 6 above JUST ABOVE IT

9. SAVE your changes and VIEW YOUR BLOG That's it! Note that your favicon may not appear immediately after you've completed the above steps. In fact, it may take a few days, and in IE, sometimes the favicon will disappear from time to time due to a browser bug. ......ENJOY.
Author Unknown posted on 01:36 in


If you are a Blogger user, it is always advisable that you Back Up your template before making any changes to "EDIT HTML" under the template tab. The main reason for this is to make it easy for you to restore the template should in case the changes you wish to effect aint successful thereafter. There are two simple ways to do this in the new beta blogger.


The first method is to click the 'Download Full Template' link under the heading Backup/Restore Template on the ''EDIT HTML" page. Click on it and save the file to your hard disk.

The second method is to first put a check in the box to 'Expand Widget Templates'. This reloads the page and expands the template in the html box. Now right click anywhere within that text box and choose 'Select All' Then right click within the blue selected area and choose 'Copy'. Open Notepad, Right click within it and choose 'Paste'. This pastes your entire template in Notepad and now save it as a text file on your pc.

It is advisable that you save it with a name that reflects the day, even the time you created the Back Up so you can always know the most recent out of the template Back Ups you might have on your pc. You can revert to your saved template by simply Uploading it with the ''UPLOAD'' button under the 'Download Full Template' link on the 'EDIT HTML' page.

I hope this short info helps..
Author Unknown posted on 00:53 in

So many people are getting into blogging. Most of these people are also using Blogger as their blogging platform. This happens almost everyday. If you’re new to blogging, here are a few things you should consider before
starting a blog on Blogger.


Use appropriate design

If you must have a blog on Blogger, then consider using appropriate design. Don't make your blog look like a junkyard. I know it is difficult to have a good design for a blogger blog simply because the template is difficult to edit. If you don't have technical skills, consider searching for blogger templates with good looks.


Use a Custom Domain Name

Your blogger blog is already hosted by Google. It will be wise of you if you use a custom domain name for your blog instead. If won't cost you much to register and configure your blogspot URL to a custom domain name. It is very risky to keep using a .blogspot.com URL for your blog.


Start with Unique and Helpful Contents

After setting up a good seign for your blogger blog and configuring your custom domain name, you need to start by posting unique contents that people want. There is no point copying and pasting from other people's blog. It just shows that you are not ready for serious blogging. And if you must copy, make sure you edit it and make it look original.

Also, your content should be written with both your target audience and SEO in mind. Keep your message clear and to the point. Ensure your keywords are used wisely in the header and the body of your text.


Make Your Blogger blog compatible with Mobile Phones

No doubt about it, thousands of people will want to read your unique and helpful contents from their mobile device. You should be ready for this by making your blogger blog compatible with mobile devices. With this, your visitors won't have problems reading your blog.


Finally, don't forget to do your adequate research for starting and for posting new contents on your blog. Don't just start a blog on Blogger for starting sake. You need to keep doing research if you want your blog to be successful. Look up Google Analytics and use Google’s Keyword tool to find what your audience is looking for.


Also, you should read through other Blogger tips that will be useful for your starting a blog on blogger. And if you are also considering starting your blog on WordPress, you can read the post on Things to Consider Before Starting a WordPress Blog

Download Easyb MS Word Guide

Email Subscription box byAshok Lothia

Contact Easyb Tricks

Privacy Policy |Copyright © 2014,Easyb Trick.All Rights Reserved. Powered by Blogger.

Contact Me Here!!!

Name

Email *

Message *